Configuring the Netgear router configurations for the cable connection is explained in detailed. Router Technical Support team always make sure to elaborate the each topic in more detail so that Netgear router users should not feel any kind of hassles while performing the router configurations.
Steps to Configure your Netgear Routers using the Smart Wizard for Cable Connections
- First you have to connect your Netgear router internet port with the modem you are using and connect your computer system with the LAN port.
- Switch off all the peripherals and wait for few seconds.
- Now, you will need to access the Netgear router configuration page using the default IP address that is 192.1680.1 or routerlogin.net address. You can also contact our router technical support team for the help if you are facing issues with Netgear Router Login.
Here are the Steps for Netgear Router Login Access
- Open the web browser and fill the Netgear router login address routerlogin.net in the address bar.
- Fill the login details for Netgear router login. The default login details for Netgear router login are, User Name: admin and Password: password
- Press enter key and you will be able to access the Netgear router configuration
After the successful login to Netgear router, follow these steps
- Go for the “Setup Wizard”.
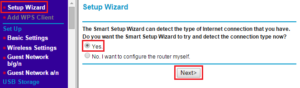
- Press Enter key and click on the Next button.

- Here you will need to press the “Next” button so that router can save all the settings.
- Go for the Maintenance option and here you can find the Router Status option.
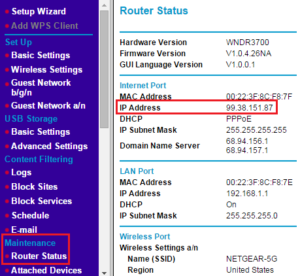
- Here you can easily check whether you are having a valid IP address or not.
These are the steps to configuring the Netgear routers with the cable connections using the smart wizard. Router Technical Support team can assist you any time you need help for the issues you are facing with your routers.