

In this post, we are going to discuss your problem of setting up the NETGEAR ex6150v2 extender. This extender from NETGEAR is a tech-miracle to enhance the reach of your current Wi-Fi router. Follow the below given simple steps to configure the Netgear ex6150v2 extender.
Configuration Netgear ex6150v2
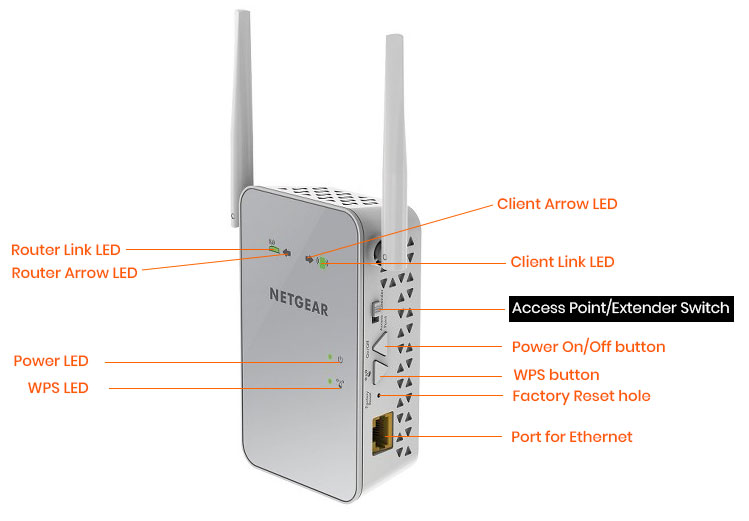
Following image is displaying the configuration of your extender, see and understand each part of your device for better set up experience.
Follow the steps to setup your Netgear EX6150v2 extender.
- Place it at an optimum location. We recommend you to place your extender near to your router or in the same room as your router.
- On the rear panel, you will see a switch called Access Point/Extender switch. Switch it to extender mode.
- Supply power to your extender by plugging it into an electrical outlet. Wait till POWER LED turns solid green.
- Connect your extender to your existing Wi-Fi network. You can do so either by using WPS method or by using NETGEAR installation assistant.
- We will discuss WPS setup method here for a quick setup.
Connect extender to existing Wi-Fi network using WPS (Wi-Fi Protected Setup)
- Press WPS button on your extender first and within two minutes press the same on your router.
- The extender is connected to your router. For verification, check the WPS LED on the extender and Link LED on the router. They both should be solid green.
- If your router is a dual band router then repeat steps one and two to connect the extender to 5 GHz band.
- Turn off your extender and plug it out. Change the location of your extender. Recommended one is midway between your router and dead zone where signal is weak. Note: Make sure your extender must be in the range of your existing router’s network.
- Turn on your extender again by plugging it into power outlet and wait for the POWER LED to turn green.
- Make sure LINK LED of router is also solid green. If not then move your extender near to the router. Keep changing the position till LINK LED turns green.
- Connect your computer to the new network of extender. The extender’s network name that will display looks like: (Existing Wifi network name)_2GEXT or (Existing WiFi network name)_5GEXT.
Check the connection speed by searching something from your computer connected to the extender network. If you still face any issue, get in touch with us.


Spot on with this write-up, I seriously believe this website
needs a great deal more attention. I’ll probably be back again to see more, thanks
for the information!